
BlogPost3 Mess with Docker
Published:
Motivation
I know how to use a docker and run some basic command within the docker environment. However, I have never been formally trained to build and operate docker. For the next project, the package I build should be contained in a docker to make it easier to operate.
A note of what I learned about building docker images
Table of contents
A course on LinkedIn.
Introduction
Docker allows to (1) gets the code to and from your computer. (2) Builds the container for you and (3) allows you to share your container to whom are different from virtual machines
Docker is a platform to build the container, share the container in a container image file
Container is ia self-contain sealed unit of software, contains everything required to run the code (operating system include, code, configs, process, networking to communicate with other container or outside environment).
Google can provide better desciption with image. Enough with the definition
Installing Docker
Docker is a program run on top of Linux Virtual Machine.
Basic command: double click to the whale logo or run it from terminal:
dockerUsually, docker require root permission to run. Therefore, it’s recommended to run post-installation commands to create a new user group and allow non-root users to run Docker as well
sudo groupadd docker
sudo usermod -aG docker $USER
- For docker on Ubuntu Linux, it’s a bit tricky to add the signing key for Docker organisation to tell the OS to trust software provided by Docker org
curl -fsDL https://download.docker.com/linux/ubuntu/gpg | sudo apt-key add -
This gets the signing key of the Docker organization, and has your computer import it as a trusted key to provide software to the system.
Using Docker
Docker Flow:
Everything starts with a docker image: the first command to play with is:
docker imagesDocker runs the image to make a docker container:
docker run -ti <image to run ubuntu:latest> bash(open docker-titerminal interactive)
It will launch the docker in root mode.
docker ps: to show the list of processes that are running. Alternatively: docker ps --format $FORMAT reformat the printing to make it more readable (Note that the $FORMAT is available at the appendix)
Running container: Everytime you run an image from docker, it creates a new container and run it separately. Even the same image/terminal, as soon as you exit the interactive terminal, the process/result runs in the container will stay in the container. Image is a fix points, never change
Stopped container: to query the list of stopped container:
docker ps -l(-lfor the last container that ran). Readable format:docker -l --format=$FORMAT-> Checkout the statusDocker commit: to make the container that you run and create the new image from the container. It will create a new image with the new installations and results your run within the container.
docker commit <container id>: it will create a new image with a longImageID.
docker tag longImageID <new_name>
Run a docker container
- Running things in Docker:
docker run-> containers have a main process and stops when the process finished
docker run --rm (docker runs a container to process something and remove when it exits).
Adding --name param can give the container a name to further query the issue in future
i.e: docker run --name example --rm -ti ubuntu sleep 5 or for multiple commands with docker run --rm -ti ubuntu bash -c "sleep 3; echo all done"
Running things then leave it to run:
docker run -d -ti ubuntu bash:-dfor detach -> it will print out an id to access the process later.Jump into a container that is running:
docker attach <processid or process name>. The escape from the attached container is a tricky one: usectrl p then ctrl q-> exit the container without killing it.Running more things in a container:
docker exec. -> start another process in an existing container, good for debug but can’t add ports or volumes
You have a container running bash in detached mode. In terminal A, you attach to this container. Next, in terminal B, you ‘docker exec bash’ to this container. Then, back in terminal A, you exit the session. What happens to the container? -> The container and all its processes are terminated.
Looking at Container Output.
To look at the output and log of the locker:
docker logs <container name>Don’t let the output get too long
Stop and remove container. Remember, if you just kill the container it will just move the container to stopped state. When you are done wiht a container in the stopped state, you should remove it.
docker kill <container name>then usedocker rm <container name>to remove it explicitly.Resource constraints,
docker run --memory maximum-allowed-memory <image name> <command>and
then CPU limit: docker run --cpu-shares to set the relative limit. If there is more resource, relative limit can allow one container to use more use more CPU.
docker run --cpu-quota to limit it in general
- Don’t let your containers fetch dependencies when they start. Don’t leave important things in unnamed stopped containers.
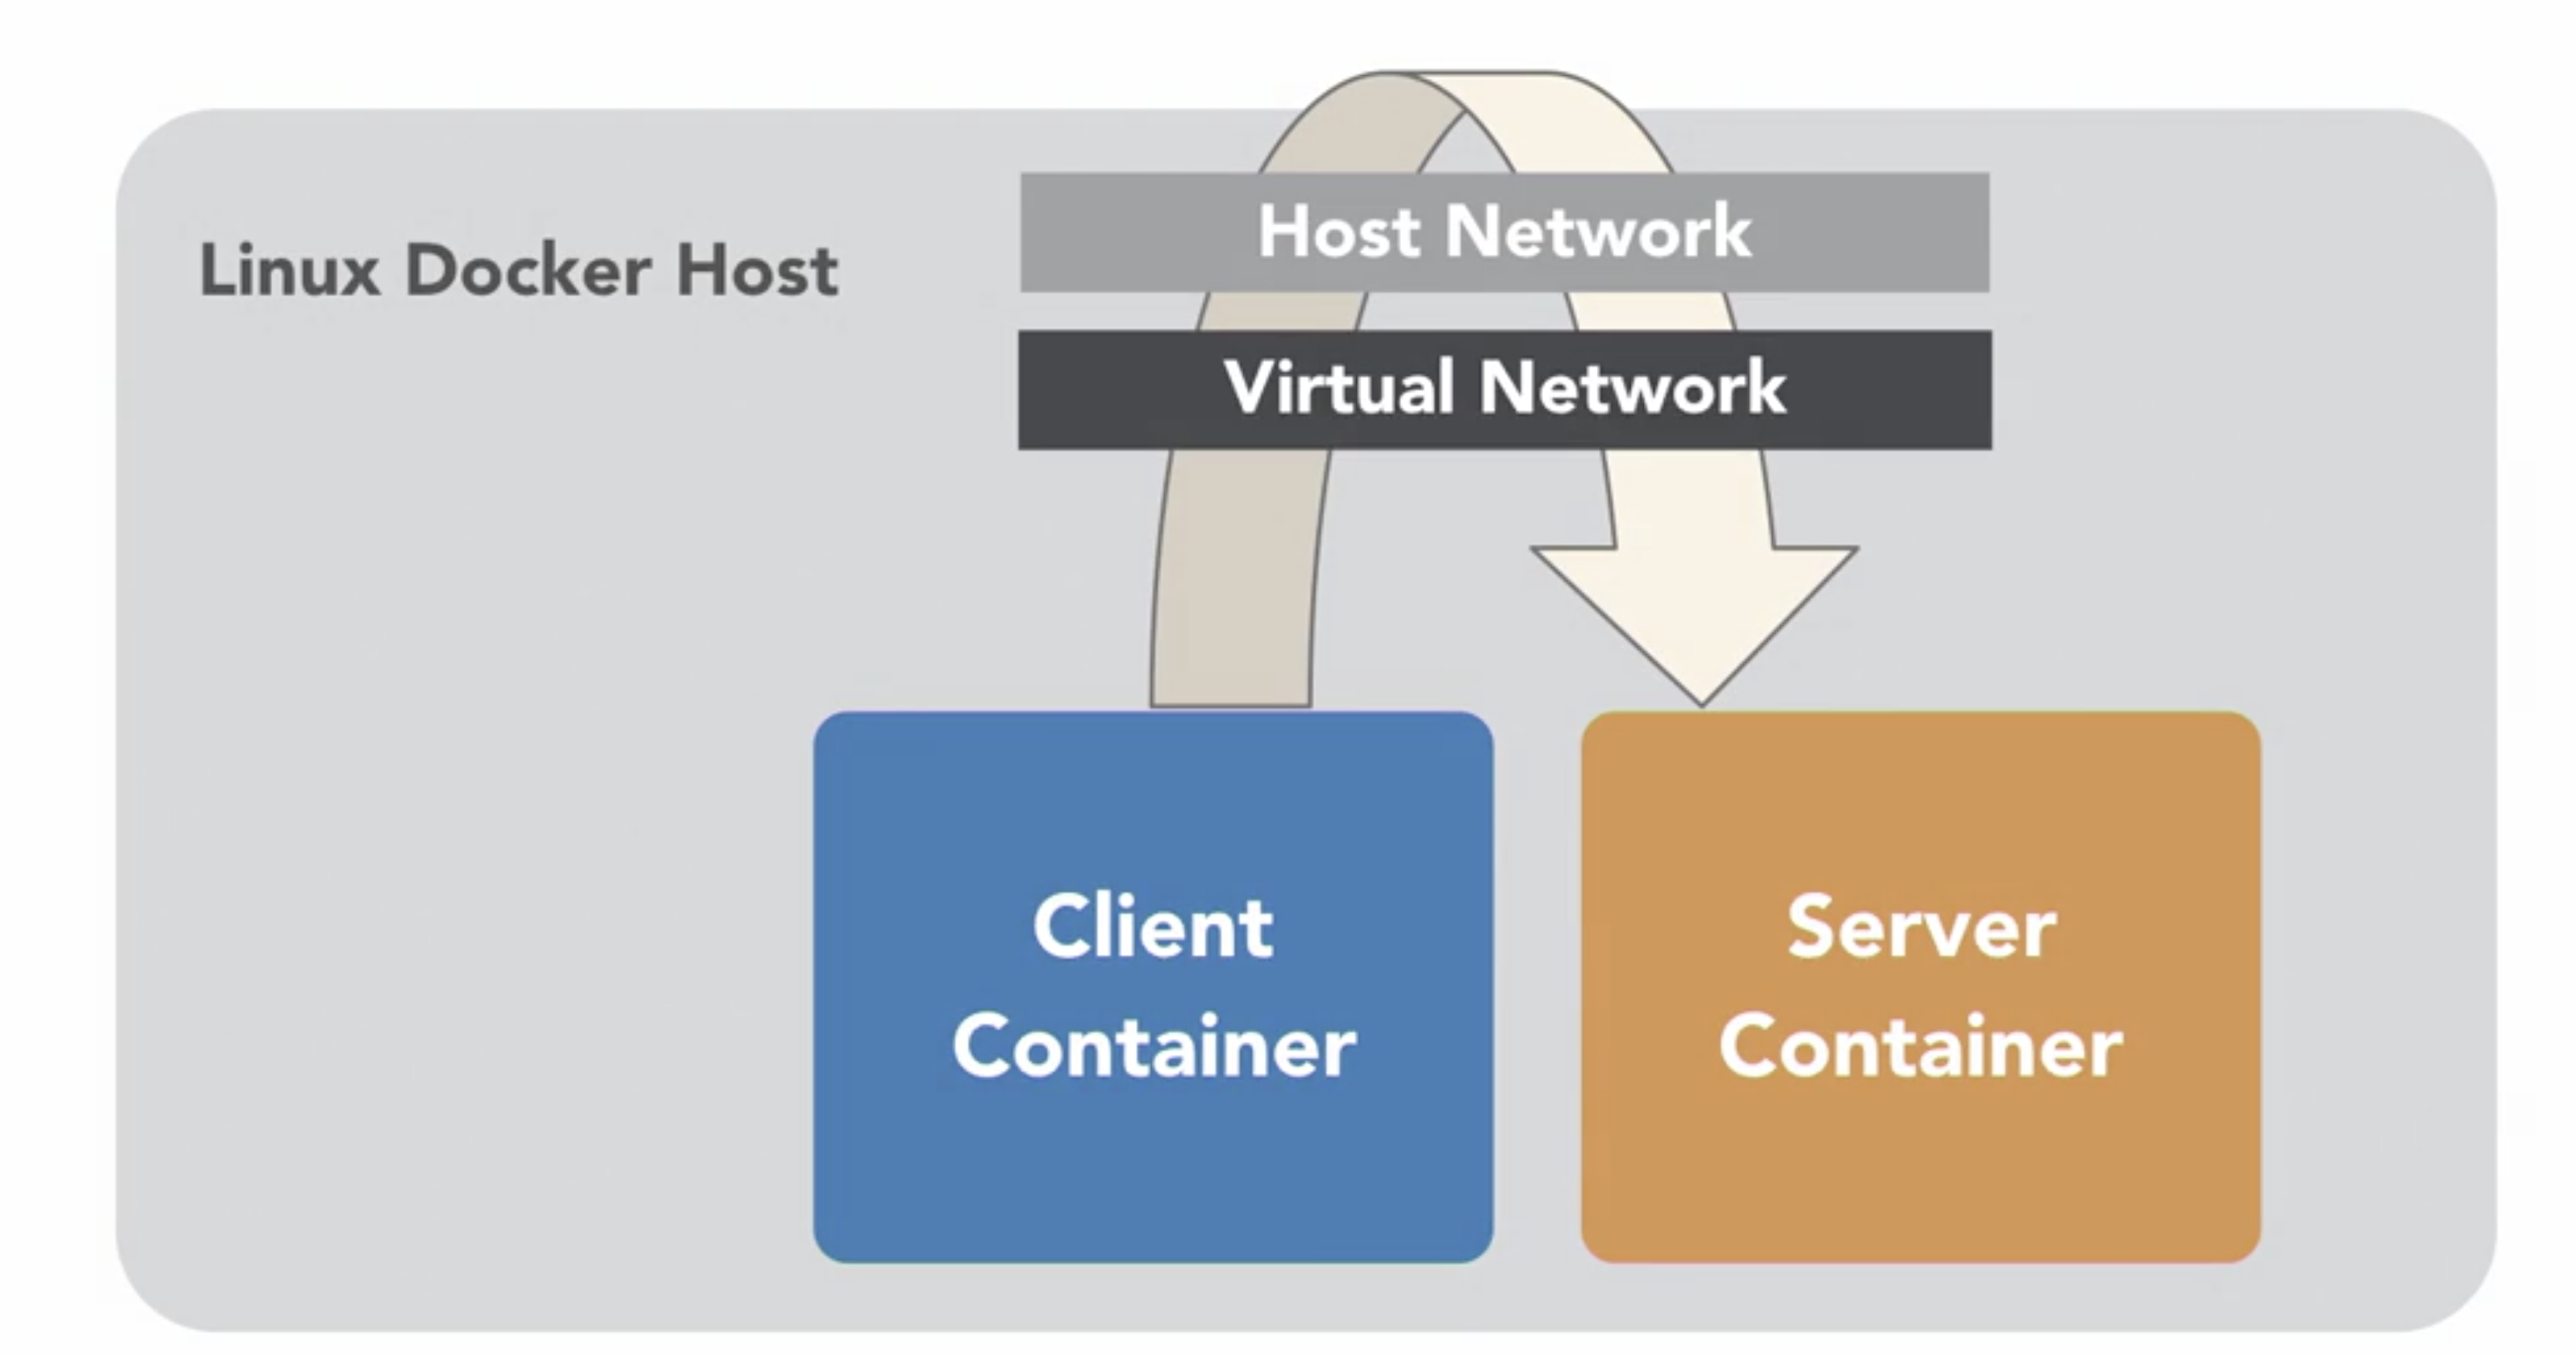
Exposing port, container networking.
Program in containers are isolated from the internet by default.
Group of containers can form a small networks
Docker can grant access connection to whom explicitly
Exposing ports to let connections in
1. Docker Ports.
To expose a specific port by specifying the port inside and outside the container.
In simple term: docker run -p outside-port:inside-port <docker-name> bash
A practical example:
Setup a server and expose a port with:
docker run -rm -ti -p 45678:45678 -p 45679:45679 --name echo-server ubuntu:14.04 bash(-pstands for public). The within the container:nc -lp 45678 | nc -lp 45679: use netcat program to listen to request from port45678and spit out to port45679setup client server #1 use command:
nc localhost 45678 lets goand then in client server #2 use command:nc localhost 45679to listen to the message.Alternatively: use docker with netcat to create a container as new client:
docker run --rm -ti ubuntu:14.04 bash. In Mac we have to runnc host.docker.internal 45678to add a specialised docker port.
create a second container for client #2: docker run --rm -ti ubuntu:14.04 bash then within second client container use: nc host.docker.internal 45679. You can send message from client container #1: here we go again
this host.docker.internal is only for Mac. For Window use machine ip.
Exposing Ports Dynamically. For multiple containers to run at the same time, docker has the ability to choose the port from unused ports. That allows many container running programs with fixed ports. This is often used with a service discovery program. Just simple use: docker port <server container name>
docker run -rm ti -p 45678:45678 -p 45679:45679 --name echo-server ubuntu:14.04 bash: Extra explain, 45678:45678 mean the internal port is 45678 and the external port is also 45678.
docker run -rm ti -p 45678 -p 45679 --name echo-server ubuntu:14.04 bash:Specify internal port 45678 and let the docker to automatically choose the external port. Outside of the server docker, use ` docker port echo-server to check the dynamically generated port for the container echo-server`.
docker run -rm -ti -p 45678/udp --name echo-server ubuntu:14.04 bash
2. Connecting directly between containers
Docker can communitcate with each other Connecting_docker
docker network ls: can be used to list out the network of containers that are runnign
docker network create learning : create a new network of containers called learning
docker run -rm -ti --net learning --name catserver : create a new container and --net set it run under the network learning.
docker run -rm -ti --net learning --name dogserver : Now dogserver can communicate with catserver, we don’t have to worry about the port since they operate under the same network. nc -lp 1234
One container can belong to multiple networks.
docker network create catonly
Then docker network connect catonly catserver: Connect catserver to catonly network
The docker run -rm -ti -net catonly --name bobcat. Now bobcat can communicate with catserver through the catonly network. But not for dogserver.
If a network preference is not specified, on which network will the container be placed, by default? bridge is the default network driver; if you do not specify a network
Host removes the network isolation between the container and the Docker host, and uses the host’s networking directly.
3. Legacy linking
Setup secrete environment variables, shared only one way.
Depends on startup order
Restart only sometimes break the links
A practical example:
- Create a new network and add the environment to it:
docker run --rm -ti -e SECRET=theinternetlovescats --name catserver ubuntu:14.04 bash. (-estands for environment) docker run --rm -ti -link catserver --name dogserver ubuntu:14.04 bash(link the newdogservertocatserver)- Using
-linkcan links two servers but limit the connection to one way. That way,dogservercan talk tocatserverbut not the opposite way.
- Take away: legacy linking works by connecting ports on one container to all the ports on the other, but not in the other direction
4. List the images
As usual, docker images to list the images that you downloaded through docker hub.
Tagging images.
docker commit <docker_id> my-image-14:v2.1: it will add the tag the the new image you commit.Docker images can accumulate quickly. Remember to kill and remove them timely.
docker rmi image-name:tag: to remove the image from the system.
5. Sharing data from container to container: Volumes.
Volumes are like virtual discs to store and shared data across containers.
Volumes are not permanent. Not part of the images.
- Sharing data with the host. (Pretty similar to virtual machine).
docker run -ti -v /Volume/Biomed/example:/shared-folder ubuntu bash. the param-vallows the volume to mount to the container.- After exscaping the container, the file in the volume remain.
- Sharing data with between containers. The data will go away as soon as there is no container hosting it.
- volumes-from
- Shared “discs” exist only as long as they are being used.
- Can be shared between containers. i.e. Init a container:
docker run -ti -v /shared-data ubuntu bash-> inside the bashecho hello > /shared-data/data-fileNext in other terminal:docker run -ti -volume-from sick_hopper ubuntu bashand you can see the folder:/shared-data
- Ephemeral volumes exist as long as the container is using them, but they evaporate when no container is using them.
6. Docker Registries
Docker registries is a software that manages and distributes images.
Docker registries can be used a reliable upload your docker images and search.
docker search ubuntu
Building Docker Images
### 1. Use DockerFile to create a docker image
docker build -t name-of-result .. The dot.means build the image file to current directory or replace the dot with the file path.Producing the next image with each step while the previous image unchanges.
Don’t span multiple lines for the large files or your image will be huge
Checkout docker file reference page for Docker builder
Docker can skip lines that have not changed using memory caching
Processes you start on one line will not continue to next line. make sure to send script in one line
Environment variable will remain to next line.
2. Build a dockerfile with a simple example
Create a file named Dockerfile
Inside the file ``` From busybox
Run echo “building single docker image.”
CMD echo “hello container “
3. outside the file: `docker build -t hello .`. The command will look within the same directory using the *Dockerfile* file. As the container is built, run `docker run --rm hello`

### 3. Build a dockerfile with a real example

1. Create a dockerfile and put these below
From debian:sid
Run apt-get -y update
Run apt-get install vim
CMD [“vim”, “/tmp/notes”] ```
- Build this:
docker build -t vimer .(vimer is the folder name). Thendocker run --rm --ti vimer
4. Adding file to previous docker
Under the Hood
Orchestration: Building System with Docker
Conclusion
Apendix
Print docker processes in a readable ways
export FORMAT="\nID\t\nIMAGE\t\nCOMMAND\t\nCREATED\t\nSTATUS\t\nPORTS\t\nNAMES\t\n"
Netcat use this param to listen to port: nc -ulp 8888
Handy command for deleting the image: docker rmi image-name:tag